Quick Summary: DoorDash is the leading online delivery platform in the United States, helping merchants, including restaurant businesses grow by reaching larger customers. Are you still running your restaurant using traditional means? Or, are you looking to expand your dine in restaurants and attract online customers? Sign up with the DoorDash delivery platform and take your business to a new level. This tutorial will help you register your restaurant on the platform in a few minutes. Let’s explore.
You are doing good with your sit-in restaurant and cafe, but don’t you think squeezing juice out of digital innovation? Attracting some more customers online apart from your existing visitors? Reaching to wider customers who are looking to taste the delicious food you have to offer? Register your restaurant with DoorDash or partner with the platform and sign up for the profits. With a 66% market share, DoorDash can help you expand and grow your business at the lowest subscription fee. DoorDash is the highly recommended platform against its rival Postmates
In this article, we will strictly focus on how to sign up and register your restaurant with DoorDash and frequently asked questions regarding it. But let us begin with the basics first.
DoorDash at First Glance
DoorDash is the largest delivery platform in the USA, started by four university students in 2013 with the purpose of delivering food to students living on campus. Today, it has grown to become the single largest delivery platform with a 66% market share.
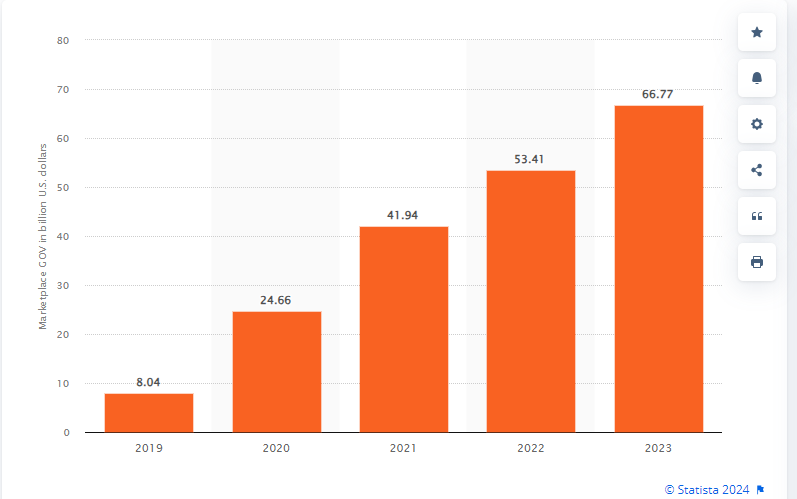
Today, the platform is not just accessible in the USA but spread across 23 markets in 25 countries, including Europe, the US, Canada, Australia, Japan, etc. With over 500,000 merchants, 37 million monthly active users, and 18 million subscriptions, DoorDash has generated over 8.6 billion U.S. dollars in revenues. DoorDash and Postmates are often compared for their impeccable services while the former gains 66% market share the later is limited to 2%.
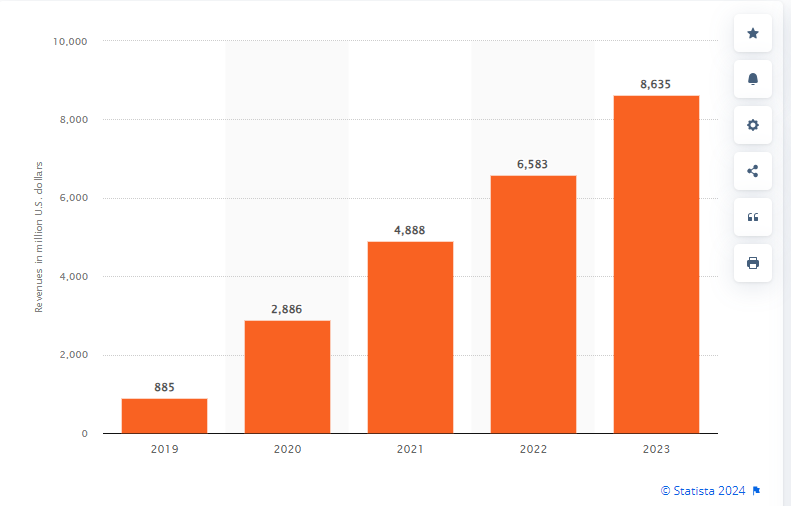
The stats given here suggest that you have all valid reasons to sign up restaurant for the platform and get your business in the mainstream.
DoorDash Restaurant Registration: How to Sign Up on DoorDash for Your Restaurant
Partnering with DoorDash will help your restaurant business grow. Since ordering food and getting it delivered to their doorsteps instead of dining out has become a new normal, it is crucial for businesses to implement online restaurant ordering systems. But that’s also not enough unless you are a reputed brand. You need to partner with third-party online food delivery vendors, such as DoorDash, Zomato, Swiggy, FoodPanda, and others. Signing up with DoorDash is as simple as registering your restaurant on Zomato, Swiggy, and others, though a few steps may be different. So, let’s explore this DoorDash restaurant registration guide.
Prerequisites:
Before you explore the steps, keep ready the following documents;
- Legal Business Name
- EIN Number (GST/HST Number for Canada)
- Business Owner Name
- Business Owner Date of Birth
- Routing Number
- Account Number
While enrolling, you will need the information handy, and you may be able to sign up quickly with the platform. Based on the region, you may have to prepare the documents, such as if you are based in Canada, you need GST/HST, and for others, EIN is mandatory.
Step 1: Get Started
To get started, you need to head to the sign page of DoorDash and fill out the form.

You can also choose to contact a salesperson who will assist in registering your restaurant on this portal.
Once you are here at the portal, input the information as asked by DoorDash.
Pro Tip: In case you are new or have complexities while signing up, you can connect with the sales team at DoorDash; they will guide you and do away with registration on your behalf.
Step 2: Create a DoorDash Account
Once you fill out the form, you will be redirected to the next page, where you need to create your account using your restaurant name and choose a robust password.
Pro Tip: Make sure to use a valid email address that you check regularly, as DoorDash will send important updates there. After setting your password, double-check all information for accuracy before proceeding to the next step.
Step 3: Choose Your Order Method
Now, the next step you have is to choose the order method. DoorDash gives a few options, such as DoorDash Tablet, Point of Sales (POS), or Email or Phone Confirmation.
Pro Tip: You can switch to order protocol anytime. Begin with any protocol that you find suitable right now.
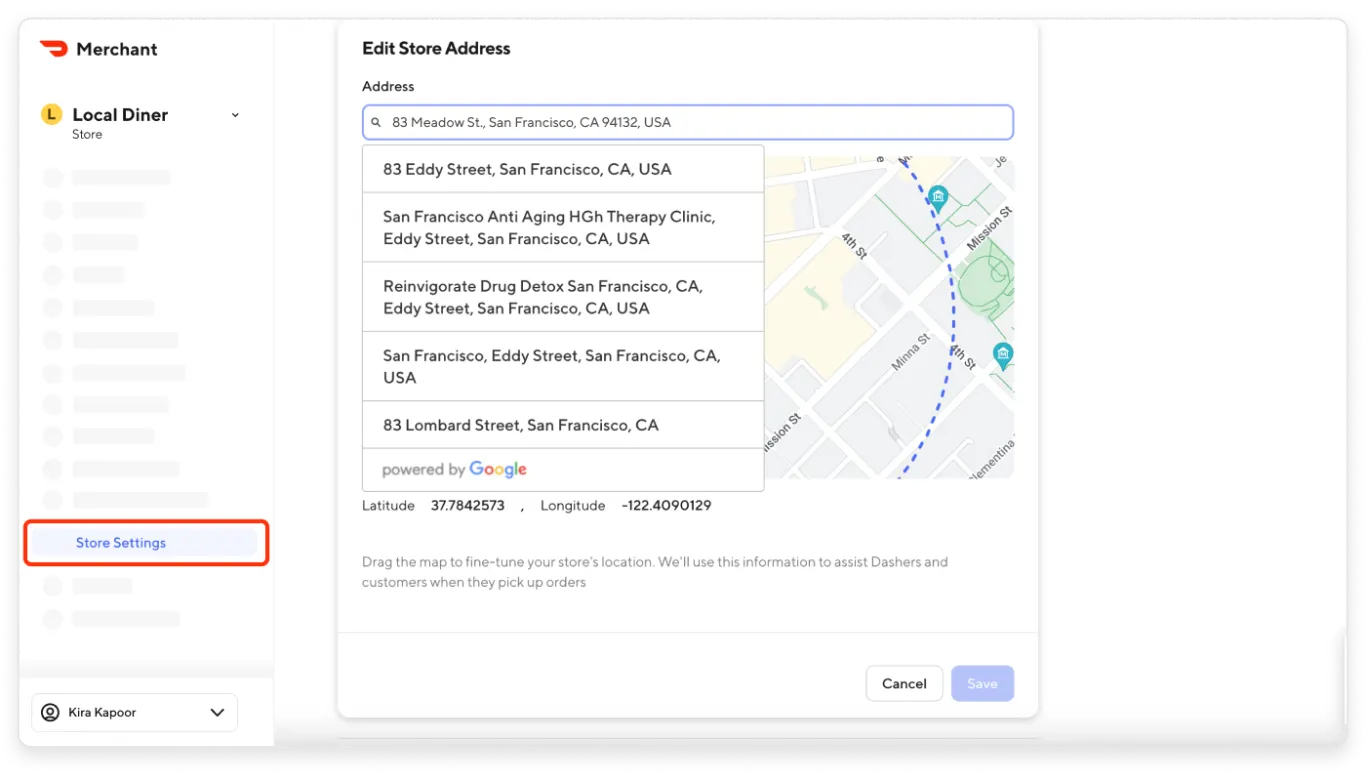
Step 4: Store Settings
In this step of the DoorDash registration process, you will have to set your hours of operation, address, and more. This allows your users to quickly check if you are still open for orders or if the store is closed. In the merchant portal, you will have five different store statuses, such as;
- Open
- Pause
- Closed
- Inactive
- Deactivated
They are for different purposes, such as;
- “Open” is to let customers know that you are open for orders.
- “Paused” is when the receiving order is paused during opening hours.
- “Closed” means the restaurant or store is closed and receiving orders.
- “Inactive” suggests the store activation process is still going on.
- “Deactivated” suggests to customers that the store is inactive and not receiving orders.
Apart from store status, you need to set the address for your store.
Step 5: Setup Menu
In this step, you get the option to create and set up an online menu for your restaurant. It’s similar to how we set up online food ordering. DoorDash provides a Menu Manager in the merchant portal. This gives you the option to choose, edit, delete, and other functionalities. You can select an image for the food and create an image by providing detailed information about the food.
Once created, submit the menu for approval.
Pro Tip: Use high-resolution images for the menu as users pay more attention to food photos than its information.
Step 6: Choose the Subscription Plan or Select the Pricing Plan
DoorDash offers three different pricing plans for restaurants:
- Basic: Save on Cost
- Plus: Reach More Customers
- Premier: Maximize Sales
For the basic plan, you will have to pay 15% per order, while for a Plus subscription, you will be charged 25% and 30% for premier subscribers.
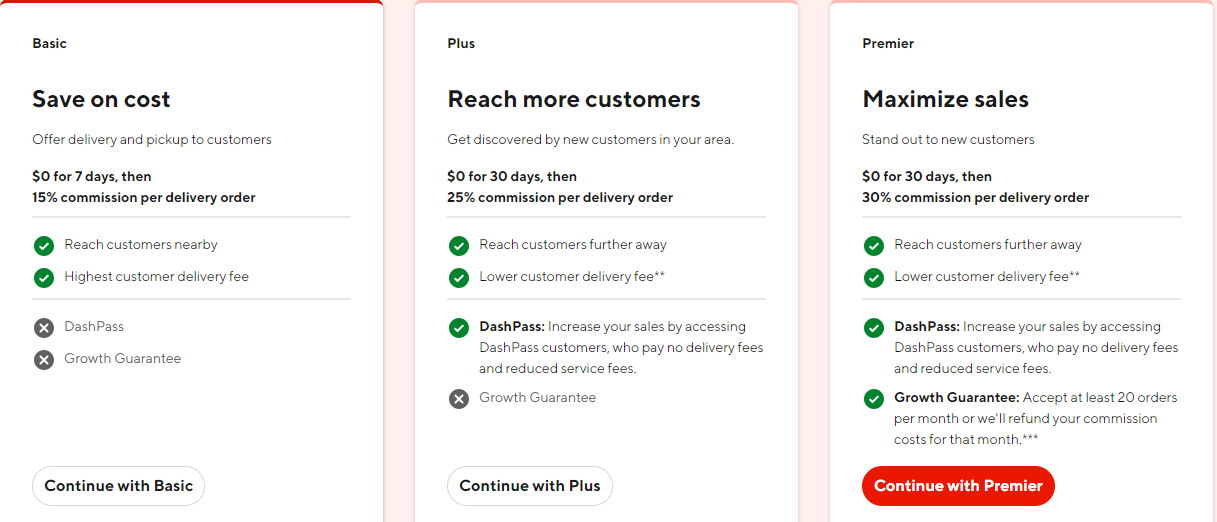
DoorDash offers three pricing plans so restaurant owners can choose based on their needs. All subscriptions include pickup orders, a storefront, marketing tools, a business manager app, and 24/7 support. While the basic plan does include DashPass and Growth guarantee, Plus escapes, Growth guarantee, and the Premier plan offers comprehensive services.
Step 7: Connect You Bank Account
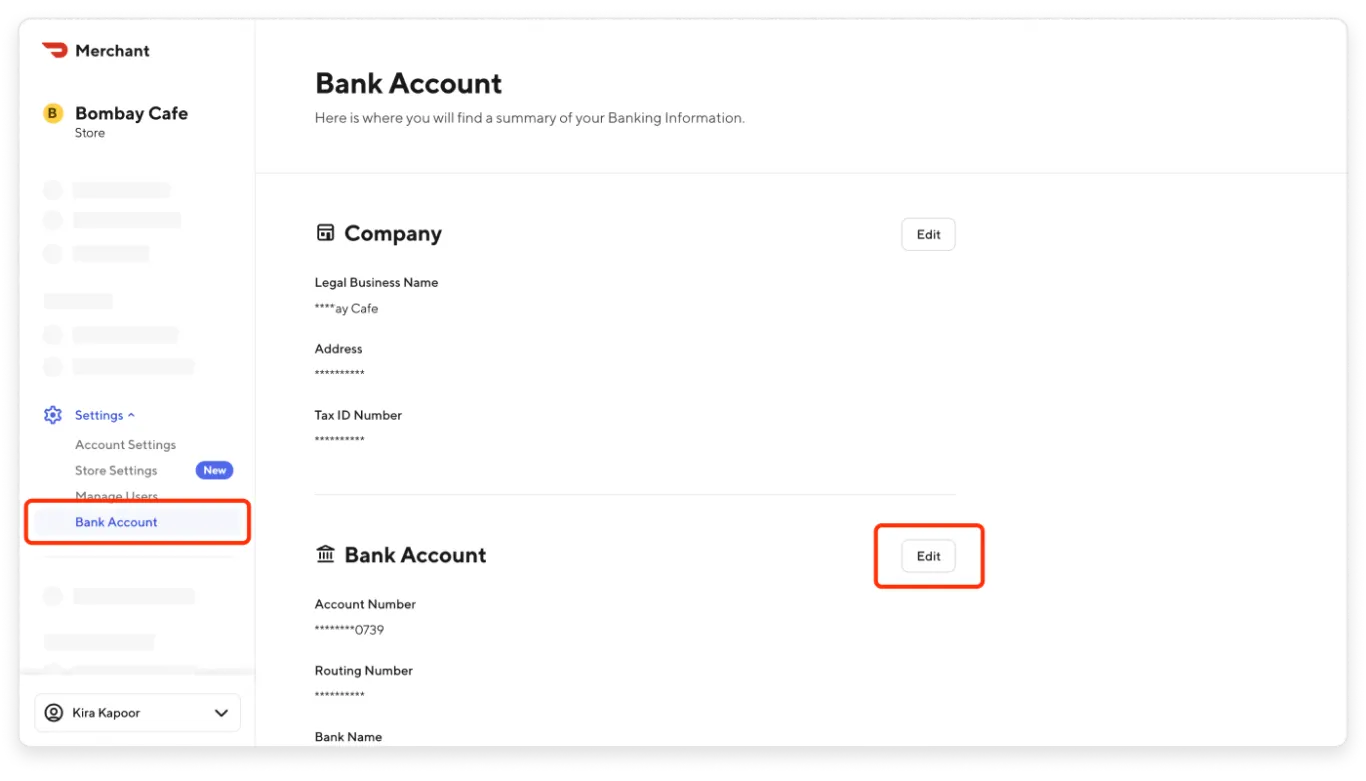
In this DoorDash registration step, you need to connect your bank account with DoorDash so you keep getting money for the orders directly into your account.
To add a bank account,
- Go to the merchant portal
- Move to Settings
- Navigate down to the Bank account
- Add update to your bank account
Step 8: Review and Submit for Activation
Once input all the information asked by DoorDash, you need to review everything and submit it for activation.
Pro Tip: You will receive a confirmation email from DoorDash once the team goes through the information and verifies it from their end. It may take around a week. If you have chosen a tablet to receive orders, you get the device in 7 days after getting confirmation mail.
Step 9: Go Live and Receive Order
Last but not least, once your store and restaurant are active on DoorDash, you can now go live and start receiving orders. You have the following things to do to receive orders, such as;
Pro Tip:You can go live using the app and receive orders, but you need to maintain some of the things, like order fulfillment, order accuracy, and delivery time.
Final Thoughts
In this guide, we have explored how to sign up and register your restaurant on DoorDash. The aim is to deliver comprehensive information, as some of the information we have provided here is time and region-bound. We recommend checking with an official portal for detailed information or connecting with the DoorDash sales team for assistance. We at Foodiv are committed to supporting our customers with a robust restaurant ordering system, albeit we continue to help our users and readers with incisive, detailed, and informative guides to run their restaurants smoothly. Connect with us if you need any further assistance with DoorDash registration or need to implement an online food ordering system. We are here to help.
Frequently Asked Questions About Restaurant Registration on DoorDash
How do I review my sales?
You can review sales when you receive payments from DoorDash. Generally, the delivery platform releases payments to its partners every Thursday, and that’s when you get a comprehensive report regarding your order, payments, and more. You can deep dive into it and get the sales report of the week.
How much does DoorDash charge for food delivery?
DoorDash charges 15 to 30% per order. The actual charge will depend on the pricing plan you have selected.
What is the pricing structure for DoorDash registration?
There’s no pricing or joining fee for the DoorDash registration apart from just a subscription fee.
How does DoorDash work?
- You sign up and register your restaurant on DoorDash.
- Once your account is activated, you will start receiving orders.
- Customers place orders using the DoorDash portal and make payments to the delivery platform. You will be notified instantly via the specified medium.
- Order can be ASAP or scheduled. The first type suggests that you need to prepare the order right now within 20 minutes, while for scheduled orders, you will be notified when you receive orders.
- Driver or Dasher will pick up the order from you and deliver it to the customers.
- DoorDash will release your payments every Thursday after deducting its fee.


